- Email: [email protected]
- phone: +44 (0) 203 916 5117
05 May
As event, conference, webinar, and meeting organizers, one of your main goals is to ensure that your attendees don’t forget about your event and can easily add it to their calendars. Let's face it—getting attendees to remember your event is often the biggest challenge. But what if you could eliminate that worry with just one simple click?
Enter the "Add to Calendar" button — an incredibly powerful tool that lets attendees add your event directly to their personal calendars with ease. And when combined with Let's Calendar, you can scale this process for thousands of invitees while keeping things discreet, personalized, and automated.
In this blog, we'll explore how to use Let's Calendar’s Add to Calendar button in your emails, helping you streamline your invitation process and boost event participation. We’ll provide a step-by-step guide, show you how to personalize calendar invites, and explain how this feature can enhance the attendee experience while keeping your scheduling operations seamless.
What is the "Add to Calendar" Button?
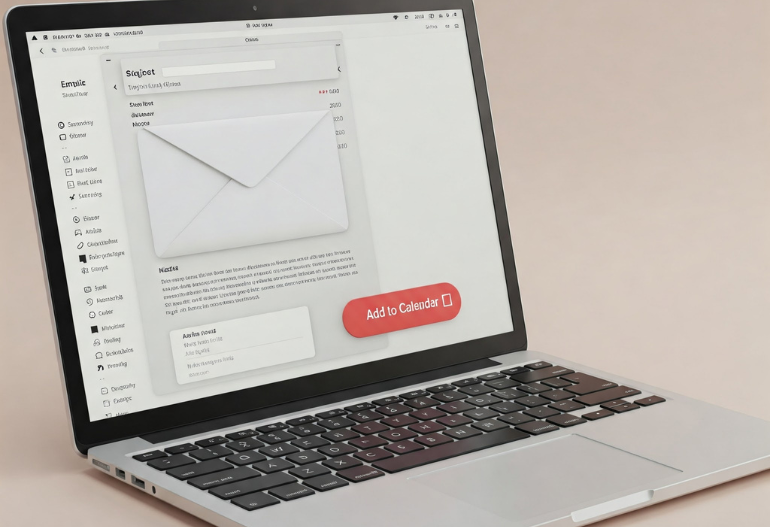
The "Add to Calendar" button is a simple, clickable link embedded in your email invitations that lets attendees add your event directly to their personal calendars—Google Calendar, Outlook, or Apple Calendar—without having to manually input event details like the date, time, location, and description.
This button dramatically reduces the risk of invitees forgetting your event and ensures your attendees have the event details stored in a format that's easy to access on their phones, tablets, or computers.
For organizers like you, the ability to send personalized calendar invites at scale is a game-changer. It not only makes scheduling easier but also helps with tracking RSVPs, ensuring you have accurate headcounts for your events.
Why Should You Use the "Add to Calendar" Button for Your Events?
Boost Attendance
By embedding the Add to Calendar button in your email invites, you eliminate the chances of attendees forgetting about your event. Once they click the button, the event is automatically added to their calendar, making it more likely they will show up.
Time Efficiency
Sending invitations can be time-consuming, especially when managing large events or multiple sessions. With Let's Calendar, you can automate the entire process, sending personalized, bulk calendar invites to hundreds or even thousands of attendees at once.
Personalization
One of the standout features of Let's Calendar is the ability to personalize each invite. Whether it’s tailoring the invite to include the attendee's name, a personalized session link, or specific time-zone information, Let’s Calendar allows you to add custom details to each invite, ensuring a more targeted and relevant message to each attendee.
Seamless User Experience
For attendees, adding an event to their calendar couldn't be easier. The Add to Calendar button takes all the guesswork out of it. They simply click the button, and the event automatically populates their calendar with all the necessary details, saving time and effort.
How to Integrate the "Add to Calendar" Button in Your Emails (Step-by-Step Guide)
Integrating the Add to Calendar button into your email invitations with Let's Calendar is simple and highly effective. Follow these steps to get started:
Step 1: Set Up Your Event in Let's Calendar
- Log in to your Let's Calendar account: If you don’t have one yet, create your free account at Let's Calendar.
- Create a new event: Select the "Create Campaign" option, and enter all the necessary event details—time, date, location (or Zoom/virtual meeting link), description, and any personalized details for your attendees.
- Add custom fields: For each attendee, you can add personalized information such as their name, company, or specific session details.
- Save the event: Once you’ve entered all the information, save the campaign in Let's Calendar.
Step 2: Generate the Add to Calendar Button Link
Once your event is set up, you can easily generate the Add to Calendar button link. Here’s how:
- After creating your campaign, turn on the Add to Calendar option.
- Customize the link by choosing which calendar platforms you'd like to integrate with (Google, Outlook, and Apple).
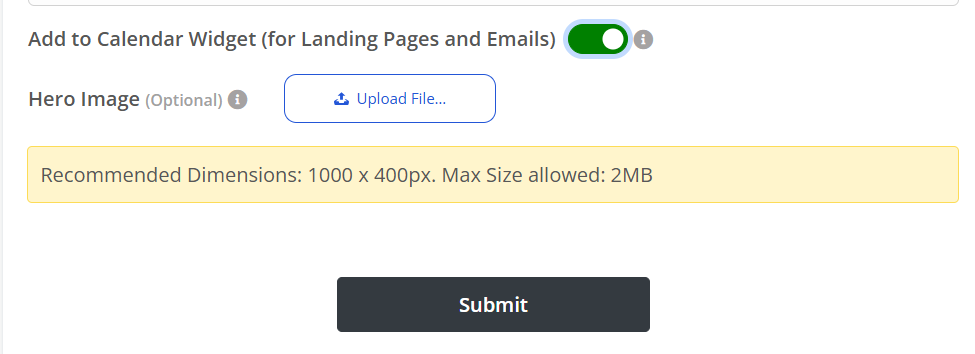
Now, you have a ready-to-go Add to Calendar button that you can include in your emails.
Step 3: Insert the Button into Your Email
There are two main ways to include the Add to Calendar button in your email invitations:
Option 1: Embed Code
If you're using an email marketing platform that allows you to edit, you can simply paste the provided embed code into the email’s body. The Add to Calendar button will appear as a clickable image or text in your email.
Option 2: Link Version
If you're using an email platform that doesn't support code or you prefer a more minimalist approach, you can use the generated link. This link will open the event on the appropriate calendar platform for the recipient to add it to their calendar.

Tip: Placement of the Button
Place the Add to Calendar button towards the top of the email or after the event details for easy access. A clear, direct call-to-action (CTA), like "Click to Add to Your Calendar", will improve click-through rates.
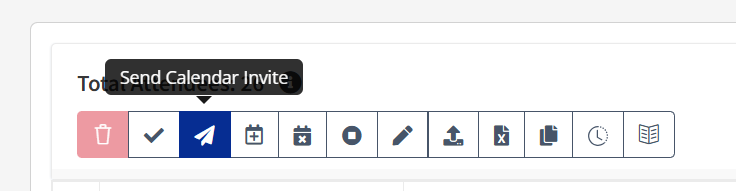
Step 4: Send Bulk Invitations with Personalization
With Let's Calendar, you can send bulk invites to your entire list while still maintaining a personal touch. Here's how:
- Upload your invite list: Import your CSV file containing the attendee details.
- Personalize each invite: Add custom fields such as attendee names, time zones, or specific session links to ensure your invites are tailored to each recipient.
- Send invites: Once everything is set up, send your invites with the Add to Calendar button included, either in bulk or 1:1.
Best Practices for Using the "Add to Calendar" Button
Consistency
Make it a standard practice to include the Add to Calendar button in every invitation you send. Whether it's for a small team meeting or a large conference, the button should be included in every communication.
Clear Call-to-Action (CTA)
Ensure the button stands out in your email. Use a clear, compelling CTA, such as "Add to Your Calendar" or "Save the Date" to drive engagement.
Testing
Before sending out bulk invitations, test the Add to Calendar functionality across different platforms (Google, Outlook, Apple) to ensure everything works correctly and looks good.
Event Reminders
Consider sending reminder emails with the Add to Calendar button included to make sure your attendees don’t forget about the event. A reminder a day or two before the event can significantly improve attendance rates.
How Let's Calendar Can Simplify Your Event Planning
Let's Calendar streamlines the process of sending personalized, bulk calendar invites. With its ability to seamlessly integrate with Google Calendar, Outlook, and Apple Calendar, you can ensure that your attendees receive the most accurate event details.
Some of the key features of Let's Calendar include:
- Automated scheduling and calendar invitations at scale
- Ability to send personalized invites 1:1 while maintaining discretion
- Real-time RSVP tracking, ensuring you have an accurate headcount for your event
- Integration with popular calendar platforms like Google, Outlook, and Apple
Whether you’re hosting a webinar, conference, or team meeting, Let's Calendar makes event management effortless.
Conclusion
The Add to Calendar button is a small but powerful tool that can drastically improve event attendance and reduce the chances of no-shows. By integrating it into your email invitations with Let's Calendar, you can automate the scheduling process, personalize invites, and ensure that your attendees have all the event details at their fingertips.
Ready to streamline your event management process? Sign up for Let's Calendar today and take your event planning to the next level!


Recent Comments