- Email: [email protected]
- phone: +44 (0) 203 916 5117
24 Apr
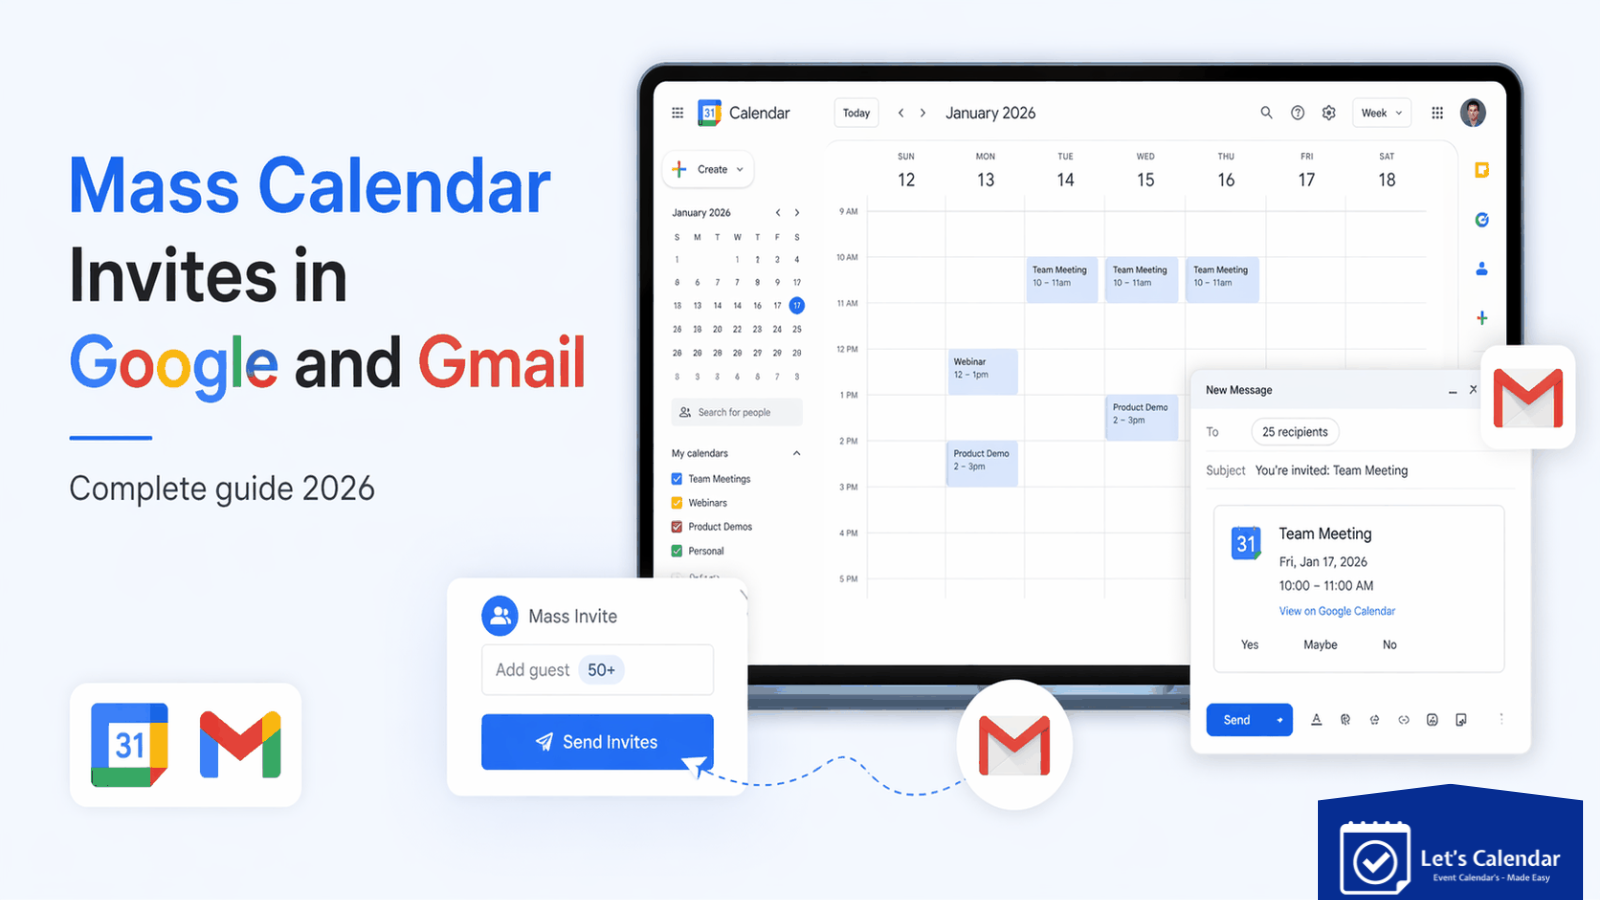
Mass Calendar Invites in Google and Gmail.
Sending a few meeting invites through Gmail is easy but not Mass Calendar Invites in Google and Gmail.
You create an event, add attendees, and click send.
But things become very different when you’re managing webinars, virtual conferences, sales demos, client meetings, or large business events where hundreds or even thousands of attendees need calendar invites google.
This is where most teams struggle.
They try using Google Calendar or Gmail to send bulk invites, but quickly run into problems like:
- manually adding attendees one by one
- invites landing in spam folders
- no way to personalize invites
- difficulty tracking acceptances
- Google sending limitations
- poor attendee experience
For marketing teams, webinar managers, event planners, and audience generation teams, this creates unnecessary operational work and often reduces attendance.
This is where platforms like Let’s Calendar help solve the problem. Instead of manually sending invites through Gmail, teams can send bulk calendar invites at scale, personalize each invite, track responses, and create a smoother attendee experience.
In this guide, we’ll explain how Google Calendar invitations work, where Gmail struggles, and how modern event teams can scale invites more effectively.
What Are Google Calendar Invitations?
Google calendar invitations are digital meeting requests sent through Google Calendar that allow people to receive event details directly in their inbox and add the event to their calendar in one click.
When someone receives the invite, they can choose to:
- Accept the event
- Decline it
- Mark themselves as tentative
Once they accept, the event is automatically saved to their Google Calendar, making it easier for them to remember important meetings, webinars, conferences, or client calls.
A standard Google calendar invite gmail usually includes all important event details such as:
Event title, Date and time, Time zone, Meeting location or virtual meeting link, Description, Guest list, RSVP options
This makes Google Calendar one of the most commonly used tools for scheduling business meetings and online events because attendees don’t need to manually save the event details.
For example, a marketing team can send webinar invites to registered attendees, a sales team can schedule client meetings, and HR teams can send interview invitations, all through Google Calendar.
How to Create a Google Calendar Invite
Creating a Google Calendar invite is simple and works well for scheduling one-on-one meetings, internal team calls, interviews, or small webinars.
If you’re just getting started, here’s how you can create a Google calendar invite and send it through Gmail in a few steps:
Step 1: Open Google Calendar
Log into your Google account and open Google Calendar.
Step 2: Click “Create”
Click the “Create” button on the top-left corner.
Step 3: Add event details
Enter:
- event title
- description
- date
- time
- timezone
Step 4: Add meeting link
You can add:
- Google Meet
- Zoom
- Microsoft Teams
- webinar platform links
Step 5: Add guests
Enter attendee email addresses.
Step 6: Click save
Click send.
This is the standard method people use when learning how to send calendar invite on Gmail.
How to Send a Meeting Invite in Google Calendar
Once your event is created, the next step is making sure your invite gives attendees all the information they need to join without confusion.
When people search for how to send a meeting invite in Google Calendar, they’re usually looking for more than just adding emails, they want to send a professional invite that gets accepted.
Before clicking send, make sure your invite includes:
- A clear meeting title
- Correct date and time
- Time zone information
- Meeting link (Google Meet, Zoom, Teams, etc.)
- Short agenda or meeting purpose
- Important joining instructions
For example, if you’re hosting a webinar, you may also want to include speaker details, session timings, or support contact information.
A well-written meeting invite helps attendees understand the value of your event and reduces last-minute confusion. It may seem like a small step, but better invites often lead to better attendance.
How to Add Multiple Attendees to Google Calendar Invites
One of the most common questions event organizers ask is how to add multiple emails to Google Calendar invite when managing meetings, webinars, or event registrations.
Google Calendar makes this process simple for small groups. While creating your event, you can add guest email addresses in the “Add guests” section and send the invite to everyone at once.
This works well when you’re:
- Inviting a few team members
- Scheduling client meetings
- Sending interview invites
- Managing small webinar groups
For example, adding 10–20 attendees manually is usually manageable.
The process of inviting someone to Google Calendar is also simple, you create an event, add their email address, and send the invite.
But challenges begin when your attendee list grows.
For larger events like webinars, conferences, and enterprise meetings, teams often need to invite hundreds or even thousands of people. At this stage, how to send out a Google calendar invite is a biggest task manual Google invites become difficult because:
- Managing large email lists takes time
- Audience segmentation becomes difficult
- Personalization is limited
- Manual errors increase
- Different attendee groups may need different event details
For example, speakers may need special joining links, VIP attendees may need exclusive sessions, and sponsors may require different schedules.
Google Calendar works well for basic invite management, but large-scale events often require more flexibility and automation.
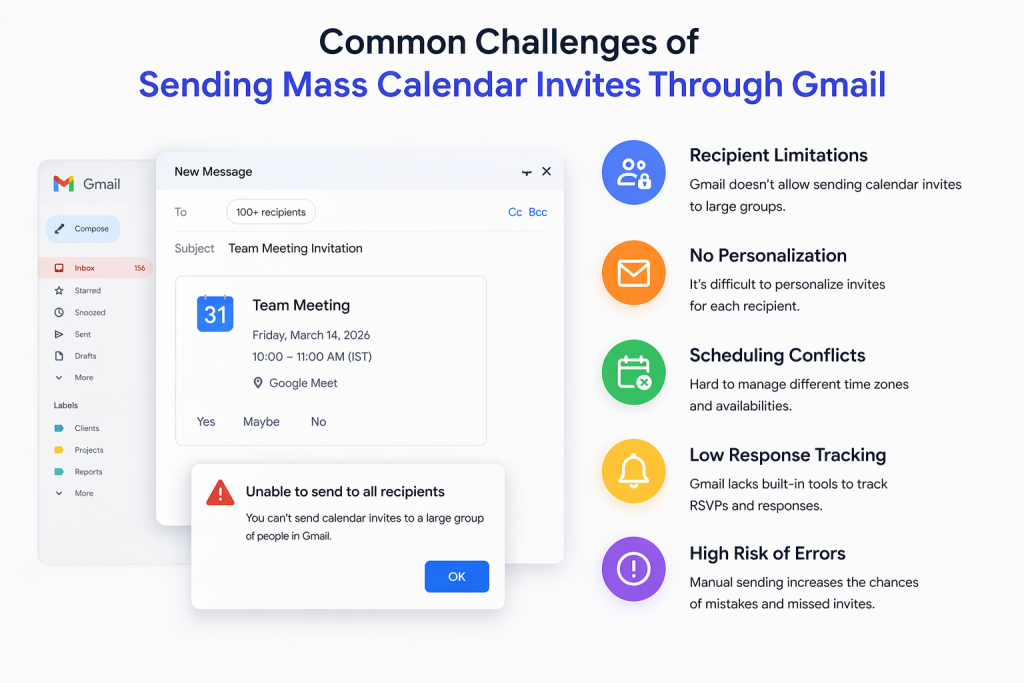
Common Challenges of Sending Mass Calendar Invites Through Gmail
Using Gmail and Google Calendar works well when you’re managing small meetings or internal team calls. But as your event audience grows, these tools start creating limitations.
Many event teams rely on calendar invites Gmail workflows in the beginning because they’re easy to use. However, when you’re sending invites for webinars, conferences, client meetings, or large virtual events, manual Google invites become difficult to manage.
One of the biggest challenges is Google sending limits.
For example, Google Workspace accounts typically allow up to 2,000 emails per day, while personal Gmail accounts have much lower limits. If you’re trying to send invites to a large audience, you may hit these limits quickly, which can delay your campaigns.
Along with sending restrictions, teams also face several other issues:
- No personalization: every attendee receives the same invite
- No proper response tracking: difficult to know who accepted or declined
- Manual follow-ups: teams spend hours sending reminders
- Limited audience segmentation
- Higher chances of human errors
- Poor scalability for large events
For example, if you’re managing a webinar with 5,000 registrations, manually sending invites through Gmail can become time-consuming and unreliable.
Google is great for personal scheduling, but it wasn’t built for large-scale event operations, enterprise webinars, or bulk invite campaigns.
That’s why growing event teams often look for smarter tools that help them send invites at scale without these limitations.
A Smarter Way to Send Mass Calendar Invites at Scale
This is where traditional Google invite workflows start falling short and where platforms like Let’s Calendar become a better solution for growing event teams.
Instead of manually managing invites through Gmail, Let’s Calendar helps businesses send bulk calendar invites faster, smarter, and with better personalization.
With Let’s Calendar, teams can:
- Send thousands of invites at once
- Personalize every invite for individual attendees
- Send invites discreetly as 1:1 communication
- Track attendee responses
- Manage RSVP updates
- Reduce manual follow-up work
- Handle webinars, conferences, and recurring meetings at scale
For example, a webinar company sending 5,000 invites can still personalize communication for every attendee. A conference organizer can manage different attendee groups like speakers, sponsors, and delegates without manually sending separate invites.
Another major advantage is the attendee experience.
Modern users prefer simple actions like:
These one-click options make it easier for attendees to instantly save event details to their preferred calendar platform without manually entering information.
To get the best results from mass calendar invites, teams should also follow a few simple best practices:
- Keep invite details short and clear
- Always verify meeting links before sending
- Segment your audience properly
- Personalize communication whenever possible
- Send reminders before the event
- Track responses to improve attendance
When your event operations start scaling, using the right invite platform can save time, improve attendance, and create a much better experience for both your team and your attendees.
Conclusion
Mass Calendar Invites in Google and Gmail works well for basic scheduling.
But when your business grows and your events become larger, manual invite workflows create unnecessary problems.
Understanding how Google invites work is important but scaling requires better tools.
That’s where Let’s Calendar helps event teams send smarter, more personalized, and scalable calendar invites without operational headaches.
And in 2026, that difference can directly impact your attendance and event success.
Register Free in Let’s Calendar to make your calendar sending process automated!
Shubhi is a calendar invitation and event technology specialist at Let's Calendar, helping organizations improve attendance and simplify event scheduling through scalable calendar invitation solutions.
Related Post


Shubhi Patel